
Tag:long exposure

Tuesday morning, as pre-arranged the night before, everyone was up in the dark, out the door by 6 am and heading down to the Mildura Wharf for sunrise.
Sunrise On The River
The river was still and quiet, save for the morning bird calls and the odd early morning jogger going past. We were set up on a lovely wooden walkway that gave a good view down (up?) the river to the bridge over the Murray. But, even at that hour, there was a constant stream of traffic across the bridge.

By 6.45 am, the sun was coming up, more joggers and walkers were going past, and traffic was picking up… the river and the houseboats all remained quiet, though.

Back On The Road
Once the sun was up, we headed back to the motel for breakfast and showers, then booked out and headed to Broken Hill, 296kms up the Silver City Highway. The road is well-maintained bitumen but long, with the occasional bend to keep you on your toes. Between Mildura and Broken Hill, reception drops off quickly once out of Mildura, and you don’t get it back till about 20kms out of BH. There is only one little general store between Mildura and BH and three unattended rest stops. Apart from that, it’s just you and the goats..lots and lots of wild goats beside the road and the emus.


Broken Hill
We made it to BH by around 1 pm – where the group met up again at the Demo Club. The club began life as the Barrier Democratic Social Club, a working man’s club similar to the RSLs, but it has evolved into a curious cross between a pub and an RSL. There are no half-full wine glasses here.. every glass was a millimetre from the top and half the price of the victorian pubs. We booked into our rooms at the motel from the demo club, unpacked, and took a brief rest before heading off again. This time we were off to the Line Of The Load, a miner’s memorial overlooking BH. It has the name and cause of death of every miner who has worked the mine in BH… and there was a lot. No such thing as OH & S a hundred years ago.

Sculptures In the Desert
From the memorial, we headed just outside Broken Hill to Sculptures in the Desert – 12 sandstone sculptures on a hilltop. With Bill and Deanne Holmer from Melbourne Light Painting, we would shoot the sunset and then do a little bit of light painting before the ranger kicked us out at 7 pm to lock the gates.


Right on clockwork, the Ranger turned up at 7 pm and dispersed the party…then it was back to BH for dinner at Mario’s Palace Hotel…made famous from the movie Priscilla Queen Of The Desert.

Princes Pier in Port Melbourne is a heritage-listed structure adjacent to Station Pier. The railway lines used to down the centre connecting it to the Port Melbourne Rail line. For this reason, it was initially named New Railway Pier.
Wartime Use
The pier opened on 29 September 1914. Significantly, the first Australian convoy carried troops to fight in WW1 left from its newly completed first section. Many of the soldiers who returned to Melbourne at the end of the war also disembarked at Princes Pier.

In honour of the royal visit by the Prince of Wales, it was renamed Princes Pier in 1921. The pier’s iconic two-level timber Gatehouse was added in 1935. This enabled better monitoring of cargo and traffic on and off of the dock.
The pier was also the departure point for Australian troops and the arrival point for the American forces during the Second World War. In the years following the end of WW2, it became the first landing point in Australia for post-war migrants along with Station Pier. Subsequently, over one million migrants landed there between 1947 and 1969.
Declining Years
The last migrant ships arrived in 1969. Additionally, with the shift to containers and the massive containerships being too big to berth at the pier, the dock was used less and less. Eventually, this led to Princes Pier being decommissioned in 1985. Over the next two decades, it deteriorated severely. In 2006 the Victorian Government committed $34 million to its restoration. The existing deck structure was removed. One hundred ninety-six metres of the pier were reconstructed, incuding repairing defective timber piles to support a new concrete deck. The gatehouse was refurbished, and a forest of piles was created at the seaward end of the pier in order to create a heritage and sculptural centrepiece. Today it’s a favourite spot for fishermen and photographers alike.


Long Exposure Photography or slow shutter photography uses long shutter speeds to capture stationary, static objects while blurring out the moving elements.
What is Long Exposure Photography?
It is most commonly used for night photography, stars, and moving water. It is also used for fireworks and light painting. A bonus in high-traffic areas is if the exposure is long enough, pedestrians will completely disappear.
Long exposure photography is easiest in low light situations such as at night. But with ND filters, it can also be done successfully, even in bright sunshine. ND Filters (Neutral Density) are precisely that. They are neutral and should add no colour at all to your image. Instead, they reduce the light entering the lens. ND filters come in different strengths from .06ND and up, with the .06 giving you a two-stop reduction and the ND 3 (also referred to as an ND1000) a ten-stop reduction.
Essential
A tripod is essential for all long-exposure photography. This is because you are using speeds beyond what can be handheld with stability. Turn the image stabilisation off on the lens while it’s on a tripod and use either a remote switch to trigger the shutter or the timer function. It’s also a good idea to set a 2-second delay on the shutter. The slightest movement of depressing the shutter can blur the image. The same goes for bridges etc. Someone starts walking across if you are on a bridge trying to get a shot. Wait till they are gone.
Light Painting
Light painting is best accomplished in bulb mode. Set your ISO to 100 to limit the noise, and make sure noise reduction is turned off on the camera. If you are interested in Light Painting, I highly recommend the events run by Melbourne Light Painting.


Moving Water
One of my favourite long-exposure subjects is water. Waterfalls, streams, rivers, ocean tides, and waves are where the ND Filters come into their own to give you the milky fairy floss water or mist. For early mornings or late afternoons, an ND2 or ND4 is sufficient. However, for bright sunshine, you’ll need to get out of the ND3. You can also stack the filters, but be aware if your filter gives off a slight colour cast, stacking them will magnify the result. I started with the round screw-in filters. However, I moved to the square ones as I wanted to add graduated filters to my pack. Variable filters are something you want to avoid at all costs. They leak light and give you terrible results.

Settings
To do an extended water exposure, set your camera to Aperture Priority, ISO 100, and the F stop you prefer and take the shot. Note the shutter speed, and using an ND calculator app, calculate the shutter speed for the long exposure. Next, move to manual mode, and use the same F stop, Focal length, and ISO. For example, if using an ND ten stop, it will be so dark you need to focus on your subject before the filter is added. Once the filter is on, then switch the lens to MF. Once you have done your settings, add the filter and take the shot.
Note: if the water is moving fast, such as in the falls above, a shorter shutter will give you blurred water. If it’s slower-moving or just a trickle, a longer shutter is required, as the speed of the water affects the blur.

Night Lights


If you haven’t tried long exposure before, get out and give it a go… its a lot of fun!

In 1930, the then Board of Works created a Redwood Forest at Warburton. This one predates the Otways Redwood Forest by about nine years.
They cleared some eucalypt trees and planted Bishop Pine, Douglas Fir, and Californian Redwoods in their place. This was done for “experimental purposes as part of the Board’s hydrology research program”. Over 1476 trees range from 20 metres to the tallest being 55 metres. I don’t know what happened to the program, but the trees are still there for unrestricted access, and the site is just magic. The site is now heritage listed on the Victorian Heritage Database, ensuring survival from logging.

The Yarra River runs along the back of the forest…
and we headed to this first, trekking through a narrow goat track and undergrowth to find the river, and then found a wide path coming back. In the forest, none of us thought to record our Indiana Jones moment 🙁
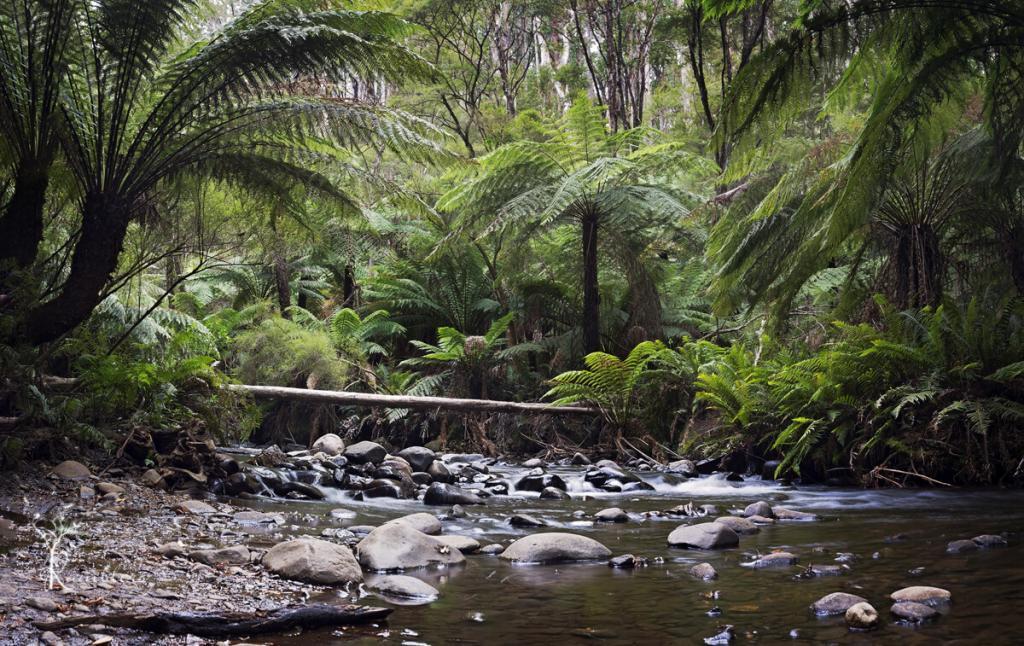
The river is lined with lush green tree ferns, water tumbled and washed over rocks. Not a sound except for running water and the birds. We were only able to get down to the river at one point, with high banks preventing access most of the length, but the spot we found was beautiful, and we spent about an hour there.
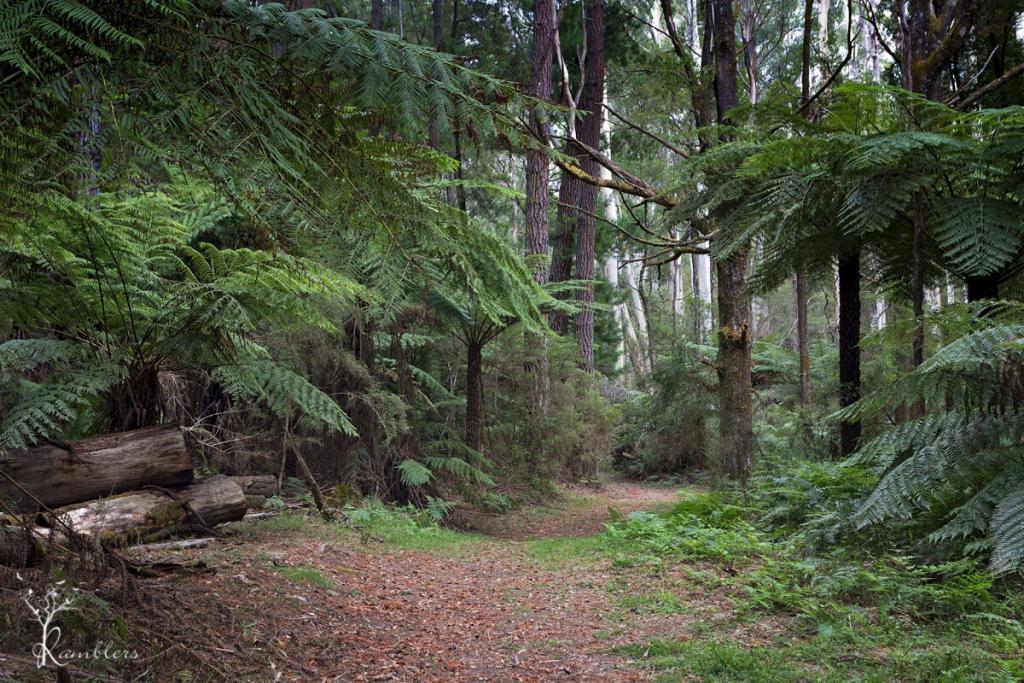
Back in the forest, we found more ‘odd’ evidence on what happens in a Redwood Forest (on a full moon?). Dotted throughout the forest were circles made from twigs and branches and, in one instance, a small shelter. There were dozens of the circles, a couple shaped like large nests, more than a bit ‘Blair Witch’ and no way would I go in there after dark 😉
Getting there:
Drive through Warburton, following the Warburton Highway until it becomes Woods Point Road. After about 7 km, take Cement Creek Road on the left. The road is unsealed and a little rough in places, but 0.7 km along, you will find a small parking area on the right along a fenceline and a small gate barrier. Walk through the gate, and there you are. Walking through the plantation will lead you down to the river, following the walking tracks each way.

I spent the weekend at Apollo Bay & Otway Ranges in late February with the MPE family of addicted photographers. We started our weekend with Hopetoun Falls. Then a picnic lunch at the Redwood Forest and afternoon tea in town at Cafe 153 before dinner at the Brewhouse. That night we did some light painting at the Breakwater with Deanne and Bill Holmer from Melbourne LightPainting.
Midway along the Great Ocean Road is the seaside town of Apollo Bay. With the lush green slopes of the Otway Ranges at her back and the blue seas of Cape Otway at her feet, Apollo Bay is a great staging point to visit the valleys, rainforests, rivers and streams, waterfalls and light station.
Sunday was an early start for a 6 am sunrise that never eventuated. Cafe 153 for breakfast, then off to the light station. It was a quick 36-hour visit, but my exhaustion when I got home was a testament to how much we crammed into it 🙂
Hopetoun Falls

Getting here is easy. If you come through Colac or the Great Ocean Road, head to Binns Road, and it’s well signposted. Once at the carpark, you have a one-way in and one-way out downhill walk.
Hopetoun Falls has a good flow for just about all year. Even though it was February, we still found a good flow coming over the top and into the Aire River below. The walk from the carpark to the first lookout is an effortless downhill walk of about 20 metres. The one-kilometre return trip of 200 plus steps to the bottom lookout (and 200 back UP) is a test of endurance for my old legs. It’s definitely worth the walk down, though. You can’t see a lot from the top lookout, and the walk through the ferns along the boardwalk to the base of the falls is impressive.
Redwood Forest

Just a few minutes away from Hopetoun Falls in the Otway Ranges is the Redwood Forest. I hadn’t been here before, didn’t even know it was there until recently, but what a fabulous find it is. Heading towards Apollo Bay from the carpark to the forest is on your right-hand side, just before a little single-lane bridge. There are picnic tables and chairs and a long drop toilet on the other side of the road. We stopped and had our picnic here before spending an hour wandering through the forest.

Running along the back of the forest is the beautiful fern-lined Aire River. The forest itself has a fantastic atmosphere.. you feel the quiet and serenity as soon as you step off the path into the trees. While I didn’t see them, others found some fabulous pagan? Stuff down back, twisted vines and things hanging from trees. The mind boggles as to what goes on in there.

Sundown
We hoped to get a sunset at the Apollo Bay Boat Harbour before light painting started. But it fizzled out on us. However, I did manage to get a pinkish sky using a 0.9 ND Grad.


Light Painting
We held our light painting session down at the Breakwater Led lights, steel wool spinning pixel sticks fabulous night.


Sunday Morning – Sunrise Failure
Sunday morning, despite getting up in the dark and heading down to the breakwater full of enthusiasm, it fizzled out on us again.

Cape Otway Lightstation
It sometimes gets sunny at the light station, but I seem to bring clouds. I have been there a few times, and getting a photo of the lighthouse in full sunshine against a blue sky is very hit-and-miss. It was a patchy cloud, then a full cloud for a quick, brief bit of sun and back to clouds when we headed there.


We came across two french girls guarding an injured Koala and reported it to the conservation centre for pickup (rang the next day, and the koala is doing fine). So down to the lighthouse for some shots and a walk around before heading back to the car for the 3-hour drive home. Fabulous weekend and we are already planning the next one.

As the saying goes, ‘the best-laid plans of mice and men often go astray. Add photographers to that, too.
A group outing
A large group of us from Melbourne Photography Excursions headed down to Princes Pier and their famous pier pylons on Melbourne Cup Eve. It had rained most of the morning; the skies were heavy and leaden. Our original plan was to photograph the pier pylons at sunset, but the sky hid behind a heavy cloud. The wind blew straight off the bay, and the added wind chill factor with the day’s rain made for a freezing photoshoot. We did a group shot first. Maureen from Shoot Melbourne took our photo before we all froze. We are a hardy lot (that’s hardy, not foolhardy!).

ND Filters
To add to my woes, my new ND filters hadn’t arrived, and I used my ND10. This is a highly dark filter. I have to focus, flip the switch to manual focus and add the filter, as once it’s on, the camera hunts in the dark for a focus point. This works fine if I take very long exposures. Beyond 30 seconds, I need to go to bulb mode. No problem, I will use my remote switch in bulb mode. Hmmm, huge problem: the remote is flat as a tack, and I don’t have a spare battery with me. Drop ISO, drop exposure, come up to F22, and I ended up with a reasonable 30sec long exposure.
Ships at the pier
Three ships were in port that night for the Melbourne Cup. So we were all chopping and changing between photographing the vessel and the pylons. And moving around helped prevent hypothermia.

At one point, the Spirit of Tasmania started steaming out of port bound for Devonport, Tas. With the wind whipping off the choppy seas, I didn’t fancy their chances of a smooth crossing.


A lacklustre sunset
Just as the sun went down, we were treated to a pop of colour on the horizon, and all cameras swivelled in that direction. Not the sunset we were hoping for, but as we didn’t expect one at all, we accepted it gratefully 🙂
As night dropped, the ships lit up, and the pylon’s lights came on, providing us with light to see. Finally, we threw the towel in around 8.30 and returned to the car’s warmth.

Footnote #1: My run of poor planning hadn’t finished. When I repacked my bag, I seemed to leave behind the flat remote. Fortunately, all was not lost, as one of the members found it, posted it to the group looking for an owner and a week later, the remote and I are now reunited 🙂
Footnote #2: Filters arrived two days after the excursion!

Tooronga Falls is just east of Noojee, Vic, and is easily accessible from the car park via a 750m walk.

The falls are photogenic, with an excellent year-round flow. On the walk to them the falls, we found lots of opportunities for photography. Tall mountain ash, tree ferns, moss, lichen, and the Latrobe River running downhill all caught our eye. Eventually arriving at the falls, there is a well-situated viewing deck that’s quite close to them. And thankfully, a seat, which we collapsed into after the uphill slog 🙂
The Walk to the falls
According to VisitMelbourne.com, the track is listed as ‘hardened gravel and compacted surface’, and it is quite solid and easy to walk on. We didn’t find it muddy or slippery. However, I beg to differ on the ‘gentle uphill sections’. Gentle for the young and fit, maybe, not the senior and slow.

Unlike many waterfalls I have visited, you walk UP to this one, and the return journey is downhill. Which did save me from arriving back at the car park red-faced and gasping like a ten pack a day smoker 😉 There is a longer 2km walk that includes Amphitheater falls. When we were finished at Tooronga Falls, our stomachs were growling, so we headed back to Noojee.

Noojee Trestle Bridge
Settled in the 1860s by gold prospectors Noojee today, is a tourist town on the main route to the Mount Baw Baw ski fields. After leaving the falls we called into the Toolshed Bar and Bistro at the Outpost for a late lunch. Food was excellent, servings were large, and the ambience very quaint and rustic. Definitely a good find.

We headed back west of Noojee and stopped off at the historic Noojee Trestle Bridge. Constructed in 1919 as part of a railway to haul timber out of the district, the bridge is no longer used. However, it is the highest trestle bridge in Victoria and has been restored. There are steps from the car park at the base of the bridge leading up to the top. You can also walk along the cycling and walking trail across and back down the other side.


After August’s first highly successful and enjoyable light painting evening at Bradmill. Another was scheduled for October. In Yarraville, the old Bradmill Factory has been sold to a Chinese developer for $160m. It’s expected to be pulled down and redeveloped into a mini-city, but it’s a photographers mecca until then. And the Bradmill Factory and Lightpainting go hand in hand.
Bradmill
The place is massive.. and I do mean massive—all 24 hectares of it. Opening in 1927 and producing fabrics in heavy-duty cotton and canvas products it was abandoned in 2007 when manufacturing moved overseas. The main buildings are huge, open floor areas, pocked with small and alarmingly deep holes. Every wall is covered with graffiti and every window is broken. Broken glass, empty bottles, burnt mattresses, wrecked and burnt-out cars lie discarded. Not a single intact external or internal door exists. Access is beyond easy. Park the vehicle and walk in.

Exploring the furnace
The light painting was starting at dark, but I wanted to get another go at the site in daylight and my first stop was the old furnace. We crawled in through the small opening and looked straight up the chimney. Adorning the walls inside was a white walker scene. everyone’s a GOT fan 🙂

Leaving the furnace we headed to the little house..apparently, coal was unloaded here, and gone up the conveyor into the main building the fire the boilers. After deciding the conveyor was sturdy enough and seeing another two photographers and two models head up there as well, we entered the little house and walked up the conveyor. It’s not too bad a hike up there… I’m not young, and I made it though the heart was pumping by the time I got to the top 😉


The Boiler Room
At the top, we found a mesh walkway with a tantalising glimpse of stairs the floors below. This top room had machinery and rollers but we could see better machinery downstairs so we headed back down the conveyor again and found an opening on ground level. Once inside again we headed up the stairs one level and hit the mother lode on the first floor…..


Lightpainting
As it was getting close to meet-up time for the light painting, we left the machinery room and headed back over to the main buildings. Lightpainting at Bradmill is fantastic, and Bill and Deanne Holmer are the Light painting maestros. They are like the love children of Mc Gyver, where they take a bottle opener, two nails and a rubber band and create something unique.

All of their light-emitting equipment is original, designed and made by them. They put on an excellent LED light show for about 30 of us, tripods lined up in front, the camera’s on bulb, with Bill calling the ‘shutter open’ and ‘shutter closed. After the LEDs, they followed up with the steel wool spinning. The factory by now was black as pitch, and when the steel wool spins, it throws out amazing sparks, dancing across the floor and roof. And standing in the middle is our own ‘God of Fire’

The Maltings at Mittagong had been on my ‘decaying, decrepit places I must visit before they are razed to the ground’ list for some time. At the urging of my travelling companion, who seemed to think there were 30 hours of daylight each day, we added it to the travelling plan of our south coast trip. Leaving Kiama and travelling to Sydney, we took a detour to Mittagong.


History
The Mittagong Maltings Works was established initially by the Maltings Company of NSW (Ltd) and operated from August 1899. Tooth and Company Limited purchased the Mittagong Works in 1905 and produced the malt used in Tooth & Co breweries in Sydney. The early 1940s was an active period, with malt’s output being approximately 200,000 bushels annually. This output was severely restricted following a large fire in August 1942, which completely gutted No.2 Malthouse and damaged No.1. The No.1 Malthouse was returned to service early in 1943. The No.2 Malthouse was completely rebuilt during the early 1950s and recommenced active operation in 1953. The process continued until another fire gutted the No.3 Malthouse in 1969. Tooths & Co continued to operate at the site until 1980 when the works were closed and the site sold to a group of local business people [Archives Collection, Australian National University]

Location
Located in Mittagong and bordered on one side by Ferguson Cres and Southey Street, it sits among housing slowly encroaching its borders. We parked in Southey St and entered through a wide-open chain-link gate. We explored the main building, first entering under a missing door to the right of the Tooheys horse insignia. The building is beautiful despite years of neglect and vandalism. Graffiti in the main building is minimal, however. This floor contained gorgeous old arched entryways between rooms, tall roof supports and an actual exposed ceiling 😉


We could not get to the second floor. Even though it appeared solid concrete, I had left my wings at home and brought common sense instead, so we didn’t climb up there. There was a staircase, but all the steps were gone. So leaving the main building, we headed down a little path to see where it led.

The Second building
This led us to the second Maltings building, lovely brickwork with arched windows again, interesting rubble… this was looking good.


Again ‘they’ had left the door open for us, so we went straight in. It was in pretty good shape for a building that’s been abandoned for 30 years. Kudo’s to the 1899 builders; they built things to last! We found a wooden staircase that looked safe enough, and we headed upstairs to the graffiti we could see through the cracks on the floor above.


Puddles! I love puddles and the reflections they make in these old buildings. But, unfortunately, this room must be close to a swimming pool in wet weather from mould and moss on the walls.


Heading back down, we went to the machinery shed. It still has remnants of old equipment, chains, rubble, giant cogs and tiny windows that look into a semi-subterranean level partly filled with water.


Through the arched windows above, you can see down into the lower level with its arched ceiling

Access to the Maltings
On the day we visited, the buildings were easy to get into, parking is right out front though it’s possible to drive your car right through the gate and up to the building. Security is nonexistent. None of the nearby residents was concerned with us wandering around with cameras. Both buildings are good, but the second was better, purely because there was more we could explore, unlike building one, in this one we could get to the upper floors.
Buddy System
I would definitely suggest taking a friend with you, though. It’s not somewhere I would go alone. Too many holes in the floor to fall through, debris to fall over and break a leg, etc.. It’s a great location, easy to spend a few hours there, but it is a large block with all the dangers that go with derelict buildings. The staircase in the second building is pretty sturdy; the one in the machine shop wobbled a bit when I tried it, and it doesn’t go all the way to the top floor. The staircase in the main building is gone. Someone has removed all the wooden steps.

The Shipwrecks and Wetlands of Homebush Bay are stunning. They are also a credit to the reclamation and beautification of old industrial locations, with paths, cycle tracks, wetlands, and shipwrecks.
Location
Previously a heavy industrial area, the wrecks are situated on the south bank of the Parramatta River. This was also the location of Sydney Olympic Park for the Sydney 2000 Olympics. Because the river is heavily polluted with dioxin, heavy metals and other chemicals, fishing is banned in the river. The shipwrecks were the remains of ships and barges from a ship-breaking yard in 1966. Behind are four ships’ hulls and several smaller barges protected under the Shipwrecks Act, 1976. This act applies to all shipwrecks over seventy-five years old. Relics over fifty years old and located in lakes and rivers are protected under the NSW Heritage Act, 1977.
We took a day trip down here to photograph the shipwrecks. However, after a week of sunrise starts, we were too slow getting out of bed and arrived mid-morning. Unfortunately, the sunrise had gone, and the sun was high in the sky. The shots I wanted weren’t possible due to the light, so we had to make do.

SS Ayrfield
The SS Ayrfield was a steam collier of 1140 tonnes and 79.1m in length. It was built in the UK in 1911 and registered in Sydney in 1912. Purchased by the Commonwealth Govt, it was used to transport supplies to American troops stationed in the Pacific region during WWII. She’s now far more beautiful with lush shrubs and trees growing on her decks and sits directly outside an apartment block. The best spots to photograph her are from the apartment block’s front or on the little footbridge. And at early light.

SS Heroic
A stunning display of rusting beauty, The Heroic is a steel-hulled steam tugboat of 258 tonnes and 38.1m in length. It lies just near the mangroves. The Heroic was built at South Shields, the UK, in 1909 for Thomas Fenwick [tugboat operators] of Sydney. It was commandeered by the British Admiralty, renamed Epic, and engaged in rescue work off the Scilly Isles during WWI. By 1919, it was back in Sydney as a working tug. During WWII, it towed Allara back to Sydney after that ship had been torpedoed off Sydney.

SS Mortlake Bank
The Mortlake Bank has been broken up, and only the stern section and part of the bow remain floating approximately 50m northeast of SS Ayrfield. The Mortlake Bank was a steel-hulled steam collier weighing 1371 tonnes and 71.65m long. It was built in the Wallsend-on-Tyne in the UK in 1924 and was purchased by a Melbourne company. The Mortlake operated between Hexham and Mortlake, transporting coal to the Mortlake Gasworks of the Australian Gas Light Company. On 31 May 1942, during WWII, SS Mortlake Bank entered Sydney Harbour. She passed through the anti-submarine boom net when the Japanese midget submarine (M-24) made entry under the ship’s keel.

Waterbird Refuge
If you follow the 1.3 km walking track past the shipwrecks, the other side of the path is home to the salt marshes of the Waterbird Refuge. We spotted several different bird species on our shipwreck spotting walk.


Well worth a day trip is Trentham Falls and the Railway Station. And if coming in from Melbourne, the bakery at Woodend is a must to stop at! Trentham is a little town with a population of 1,411 nestled at the top of the Great Dividing Range. It’s halfway between Woodend and Daylesford and is an easy one hour from Melbourne up the Calder Hwy. The Falls are just a couple of kms out of town. On Sunday, we were there, the carpark was packed, and people were constantly coming and going.
The Falls
The falls flowed well when we visited in August. They are only a short 70-metre (downhill) walk from the carpark. The lookout above the falls is quite good. It formed millions of years ago from molten lava rapidly cooling along the river. They are Victoria’s highest single-drop waterfall, plunging 32 metres into the quartz riverbed below. The Trentham website called it the ‘former’ river, but there was a river flowing the day we were there. I had planned on setting the tripod up in front of the base of the falls. But the water was too deep.

The track to the base of the falls is ‘closed’ with signs of unstable cliffs, but that stopped no one. The barrier is about 2ft high, and no impediment to stepping over or around. So we followed the goat track to the base of the falls and spent a pleasant half-hour down there among the mist, hitting the rocks, photographing the falls and the river. Going back up was a little more complicated. I felt like a veritable explorer. Until I saw a man with his pregnant wife and small son strolling down the goat track!

Trentham Railway Station
Leaving the falls, we headed into Trentham to visit the historic railway station. The station was built in 1880 but closed in the 1970s. It has been restored with some rolling stock and buildings open as a railway museum. A small market is held there on Sundays.


As it was now mid-afternoon, we decided to head back to Woodend for afternoon tea before heading back to Melbourne. After walking uphill and down dale at the falls, then around the station, we were well and truly ready for a sit-down and cuppa!
Looking for more victorian waterfalls? Check out HERE

Light Painting with Orbs and Steel Wool had been on my list of “awesome things I must do” ever since I saw a photograph of someone twirling steel wool. Finally, last night, in an old disused factory guided by the highly knowledgeable and fantastic Bill and Deanne Holmer. I scratched that itch and then some.

Lightpainting Tools
We started with a brief chat on what they use. Just about all of which is made by themselves, from your everyday household items (think secret love children of McGyver). This was followed by the critical safety message of ‘don’t fall in any holes. Being a disused factory frequented by morons who can’t stand the sight of an unbroken window, there was glass and debris everywhere. And lots of holes that used to once house equipment footings etc., Bill twirled and swirled his lights, spun the wool to many encores.
Follow the Leader
We lined up in front with tripods and snapped away. We were all using bulb mode, with Bill calling when to “shutter open and shutter off”. I hadn’t used bulb before, and it was fun to do. And something I plan to do more of. At the end of the group shooting, we broke off into smaller groups and, using their lights, experimented some more.

Orbs
I had moved off to photograph an old car as we played lights over it. Bill joined us and quickly set up a new scene. The shutter is on, light up the car, play red lights over it, then blue lights on the wall. Follow this up with an EL wire coil that glows and looks like smoke due to the motion blur. The end effect was incredible and something I wouldn’t have known how to do without his help.


They forgot one crucial safety warning: Caution, light painting can be addictive!