
Tag:photography
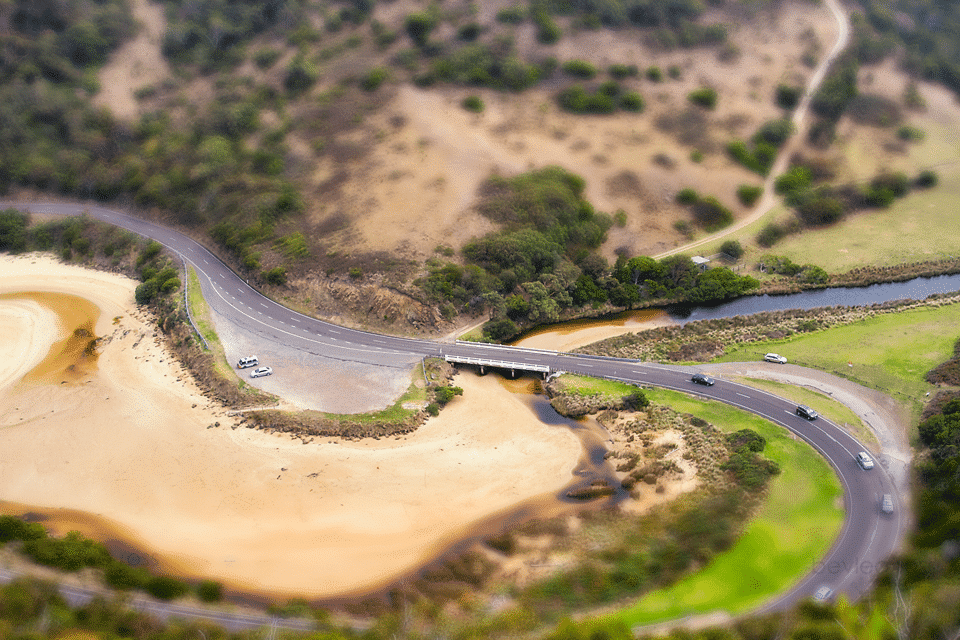
Tilt-Shift photography or miniature faking is a creative technique whereby a photograph of a life-size location or object is manipulated to give an optical illusion of a photograph of a miniature scale model.
source: www.tiltshiftphotography.net
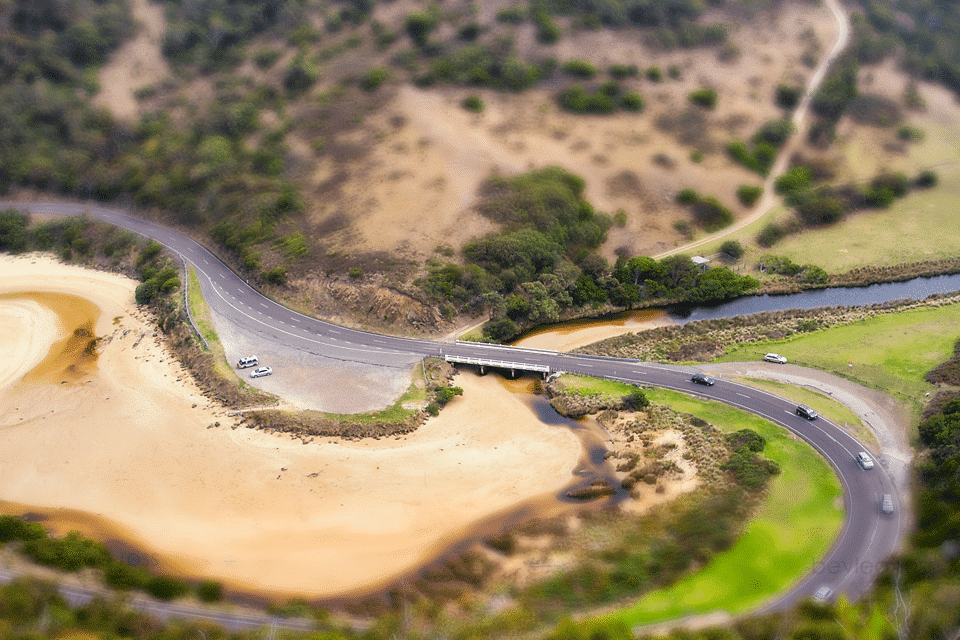
While there are tilt-shift lenses available out there, for something that you would only do occasionally, editing an image to give a tilt-shift appearance is much more realistic cost-wise, as it involves no expensive outlay of new gear.
When creating your tilt-shift image, a couple of things improve the overall impression of a miniature scene.
- Increase the color saturation and contrast, to simulate the bright paint often found on scale models
- Tilt-shift photographs look best or most effective when they are taken from a high angle to simulate the effect of looking down on a miniature scene. This works particularly well on buildings, cars, trains and people and street scenes. It’s a balancing act… too high, and while Tilt-Shift still works you lose the effect if the objects or people appear too small. Too low and they look too large to be miniature. In my personal preference/experience around 5-7 floors up is optimal at around 24mm, above that you need to zoom in. Highrise city car parks work great for this. In the examples below – the train lines were taken at a much higher elevation and look more ‘miniature like’.
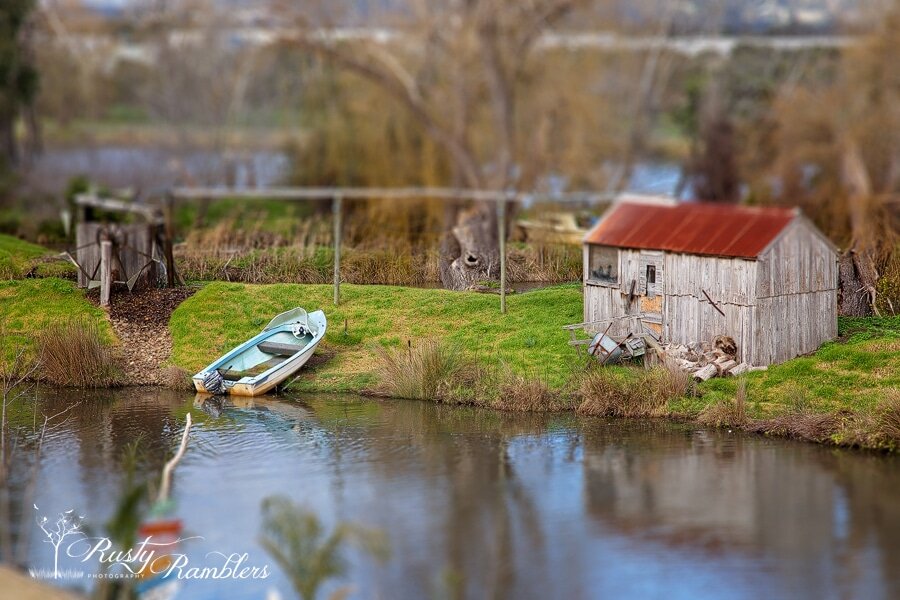
Caribbean Gardens, Melb – about three floors up

Taking the image
Shoot the scene as you would normally, then edit using your favourite software. Once the image is to your liking, there are a few ways to achieve the tilt-shift/out of focus areas
- Tilt-Shift Maker is a free web site where you can convert your image to tilt-shift. Upload your image, convert, and download. Images up to 2000px are free, above that there is a fee
- Do it step by step, in Photoshop. A good tutorial is on Tilt-Shift Maker
- Topaz Lens Effects it has several very good lens effect you can apply to images, one of them being Tilt & ShiftPhoto
- Photoshop has a tilt-shift hidden in its blur gallery. Go to Filter>Blur Gallery>Tilt Shift. You can adjust the amount of blur, move the centre focus point to where you want it on the image, adjust distortion etc.,
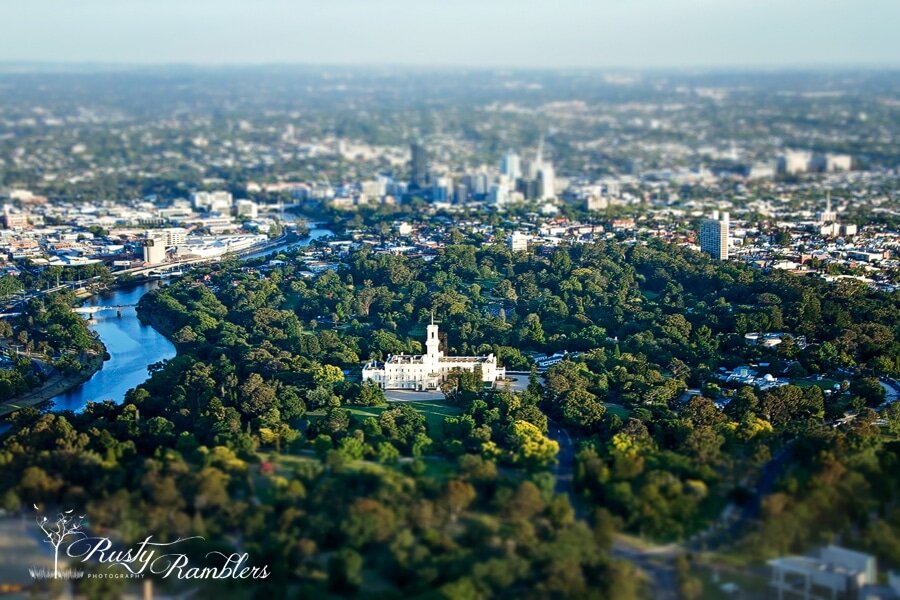
For those who like time-lapse, you can also do a tilt-shift time-lapse. However, this may require the actual tilt-shift lens or advanced software. It’s worth watching the short video Miniature Melbourne by Nathan Kaso as it gives you lots of ideas of what to shoot to achieve the effect. and if you are familiar with Melbourne. where to go to get that shot.

We were still Rambling The Outback. After a very comfortable night’s sleep in the big king-sized beds at Mungo Lodge, I was up around 5.30 and out the door just after six. Along with Lisa and Amy, we jumped in with Roy and Julie and headed off to the Mungo Lookout for a sunrise. The location was average. It was recommended to us by John at reception as a good sunrise spot. It was for viewing the sunrise. But for, shooting a sunrise it left a lot to be desired. There is no foreground interest and miles and miles of endless flat plain to the sun on the horizon. In the future, when someone recommends a spot to me, I will ask, “are you a photographer” if the answer I no, I will disregard them!

Once the sun was up, we drove down to the Historic Shearing Shed just a few minutes down the road.
The woolshed


Paddy Melons
After about an hour, we headed back to mungo lodge for showers, breakfast and checkout. Breakfast was a delicious cooked buffet in the restaurant. Leaving Mungo, we came across Paddy Melons growing beside the road.
Paddy melon (Cucumis myriocarpus) and Afghan melon (Citrullus lanatus) is both prostrate annual melons germinating in spring and summer. Their growth is favoured by good moisture relations and bare or fallowed paddocks. Melons can stabilise areas prone to wind erosion and provide stock feed when food is scarce (although opinions vary greatly). Horse, sheep and cattle losses have been associated with eating the melon, but the smell of the plants generally makes them unpalatable. Dept of Agriculture


Dirt Roads
From Mungo, we were heading first to Balranald and then onto Swan Hill. Between Balranald and us lay 154kms of dirt road. According to google maps, it’s a 5-hour drive. Maybe they assume you are driving a horse and cart as we did it in just over 2 hours. Just out of Balranald, we finally got the bitumen back.

Swan Hill
We stopped off in Balranald for coffee and comfort stop and were then on our again. Finally, driving on lovely bitumen, we arrived in Swan Hill around midday. I popped into the motel and made sure all was ready for the arrival of those travelling behind us. Then headed over to the Pioneer Settlement and organised the tickets for the evening light show, settlement entry, and Pyap Paddlesteamer ride. We wandered around the settlement for a while, bumped into a few of the group who had arrived, took a paddle steamer ride and then headed back to the hotel to relax for an hour before dinner.

Dinner was at Spoons Restaurant beside the settlement. Sitting outside on the deck, the sky started to turn a glorious orange-red. Everyone started looking and then dashed off for a couple of shots with phones—fantastic sunset, and most of us there without cameras.

After a delicious dinner, we headed over to the settlement for the Heartbeat of the Murray Laser Show. Excellent show using water, laser, and sound, it recently won a prestigious multimedia award. With the closing of the show, we went back to our motel for the night; it was the end of a fabulous week We Got to know some people better and met others for the first time by the close of the week; we had all become closer, had a million memories, and about as many photographs 🙂 The following day it was packed up and headed home and back to ‘real life’. Thank you to all who took this journey with me.

For me, this was the highlight of the trip.. remote, isolated, heritage-listed, and with a landscape, unlike anything I had seen before. Mungo National Park.
Menindee

We left Broken Hill around 7.30 am and headed towards Menindee to get there. Unfortunately, mobile reception became almost nonexistent at 7.32 am (Telstra only, and then even that eventually gave up). Though we knew that wouldn’t last long, we had good bitumen roads to start us on the way. Menindee lakes had been empty for a couple of years but now had water in them again, something we wanted to see. While not the best time of day to see them (sunrise and sunset are superb), the lakes were pretty and worth the stop.

if you ever get a chance to go to the Menindee Lakes – go for a sunrise or sunset. It’s just beautiful. The birds are active. It has a much different feel at sunset, serene. Tranquil.
Pooncarie
We headed out of town from Menindee towards Wentworth, our destination Pooncarie. The only town between Menindee and the Mungo turnoff. About 10kms out, we hit the dirt roads apart from bitumen on the cattle grids; we had dirt roads for about the next 40kms. There was no petrol at Mungo, so we refuelled the cars and headed to Pooncarie’s Telegraph Hotel for lunch. Not the best choice, though. It was the only game in town. Onions on burgers were cold; the burger pattie was burnt outside and raw on the inside. The lady behind the bar just shrugged her shoulders when we complained. Luckily none of us came down with food poisoning. Leaving Pooncarie behind, we headed off again toward Mungo. We stopped for a photo-op at the car on the pole.


We continued until we hit Top Hut Road. From here, it was around 60kms of dirt road to Mungo Lodge just outside the park. All roads leading into Mungo are dirt roads. And they get closed in bad weather. Did I mention it was isolated?
Mungo National Park
Booking in, we met the lovely John, who had been chatting back and forth with me in the preceding weeks organising everything for us. The accommodation was all cabins set in a circle around a central park area. Rooms were fantastic, king beds, lovely clean ensuites, and back porches on each cabin. Touch of luxury in the middle of nowhere! Around 5 pm, we met our guides at reception, and we followed them off into the national park itself. The first stop was the Walls of China lookout.


Walls of China
After a brief stop there, we were back in the cars and heading down onto the walls of china. Access to the great walls is strictly by guide only to ensure the area is protected. The guides carried our packed dinner for us (provided by Mungo Lodge) as we planned to shoot and then eat dinner at sunset.

Aboriginal artifacts and remains dating back 50,000 years had been found here. Making it one of the oldest places occupied by humans since ancient times.. the remains of a 40,000-year-old female found in the dunes of Lake Mungo are believed to be the oldest ritual cremation site in the world. Back then, it was a lush lake area, part of the Willandra Lakes region, teeming with life as the lake dried up. The tribes moved on.


As it got darker, we started shooting the stars. And I ticked off a second bucket list .an orb at Mungo.


Days End
by the time we headed back to the cars, it was pitch black. Bobbing torches in convoy followed the guides back to the vehicles, then the hair-raising drive back to the lodge. In the dark following, clouds of dust from the car in front reduced visibility to about 3 feet. If any roo had jumped out, he would have been on our laps. We’d have no chance of seeing him in time to stop. I had planned to do some more light painting back at the lodge, but after all the walking and driving, everyone just headed for their rooms and crashed out.

Day 3 of our outback adventure
Our plans for today were Silverton and the Daydream Mine. While I slept through the sunrise, some of the group went out hunting down a good sunrise spot. Elsewhere, two of the group went out tracking down the Indian Pacific as it stopped in town. The morning skies were sunny, blue with a light breeze, but the afternoon forecast the cloud. So it was a free morning for all. Some went to Bells Milkbar, and some checked out the Palace Hotel. Others roamed the galleries. We met up for lunch with part of the crew, and then everyone met at Bells Milkbar to head out to Silverton.

Daydream Mine
The historic Daydream Mine lay between us and our destination, just out from Silverton and 20kms from Broken Hill. Established in the 1880s the mine, and the town surrounding it were once home to around 500 workers, wives, and children. It closed a few years later when the ore ran out—the NSW government heritage listed the site in 1999. Today, above ground, only the foundations of the old town and part of the smelter remain. The road in was around 10km of uphill and down dale, winding dirt roads and through two gates.


Below Ground
After the above-ground tour, we had to gear up with hard hats and lights for the underground section. Three levels underground, down narrow steps (and I do use the term loosely) cut into the rock underground. The entrance tunnel was just a tad bigger than our bodies. If I hadn’t been in the lead behind the guide, I would have turned back with everyone else behind me. But I couldn’t get past them!


It did get taller in parts (small parts) where we could stand upright. But most of the time, the tunnels were about 4ft high. It was built for short people!

Silverton
Back up top, we got our heart rate down and air intake back to normal. Then we headed 6kms down the road to the Silverton Pub. we plopped ourselves in the beer garden, downed a couple of quick drinks, and declined to move. Until tomorrow.

Mundi Mundi Plains
While the others who could all walk (because they hadn’t done the mine either through farsightedness or cowardice) headed off for the Mundi Mundi Plains lookout and the sunset. We stayed put. We were drinking and groaning. Until Bill announced, the sunset was starting to look good. Photographic OCD got us up moving. Just as far as next door where we had a clear view. an off some shots and limped, hobbled back to the pub

Lightpainting
After dinner at the pub the entire group relocated to across the road for some more light painting…no steel wool as Bill was reluctant to start a fire and burn the town down…. but we had fun with LEDs

At the end of the night we took a careful drive back into BH, dodging a few roo’s, rabbits and goats making it safely to our motel. The next morning was to be an early start as we had to be on the road by 7.30am and heading to Mungo……
Coming Up Next Day: Mungo NP and Great Walls of China

Tuesday morning, as pre-arranged the night before, everyone was up in the dark, out the door by 6 am and heading down to the Mildura Wharf for sunrise.
Sunrise On The River
The river was still and quiet, save for the morning bird calls and the odd early morning jogger going past. We were set up on a lovely wooden walkway that gave a good view down (up?) the river to the bridge over the Murray. But, even at that hour, there was a constant stream of traffic across the bridge.

By 6.45 am, the sun was coming up, more joggers and walkers were going past, and traffic was picking up… the river and the houseboats all remained quiet, though.

Back On The Road
Once the sun was up, we headed back to the motel for breakfast and showers, then booked out and headed to Broken Hill, 296kms up the Silver City Highway. The road is well-maintained bitumen but long, with the occasional bend to keep you on your toes. Between Mildura and Broken Hill, reception drops off quickly once out of Mildura, and you don’t get it back till about 20kms out of BH. There is only one little general store between Mildura and BH and three unattended rest stops. Apart from that, it’s just you and the goats..lots and lots of wild goats beside the road and the emus.


Broken Hill
We made it to BH by around 1 pm – where the group met up again at the Demo Club. The club began life as the Barrier Democratic Social Club, a working man’s club similar to the RSLs, but it has evolved into a curious cross between a pub and an RSL. There are no half-full wine glasses here.. every glass was a millimetre from the top and half the price of the victorian pubs. We booked into our rooms at the motel from the demo club, unpacked, and took a brief rest before heading off again. This time we were off to the Line Of The Load, a miner’s memorial overlooking BH. It has the name and cause of death of every miner who has worked the mine in BH… and there was a lot. No such thing as OH & S a hundred years ago.

Sculptures In the Desert
From the memorial, we headed just outside Broken Hill to Sculptures in the Desert – 12 sandstone sculptures on a hilltop. With Bill and Deanne Holmer from Melbourne Light Painting, we would shoot the sunset and then do a little bit of light painting before the ranger kicked us out at 7 pm to lock the gates.


Right on clockwork, the Ranger turned up at 7 pm and dispersed the party…then it was back to BH for dinner at Mario’s Palace Hotel…made famous from the movie Priscilla Queen Of The Desert.

Last week, a trip that was a year in the planning finally rolled around. Our first day was from St Arnaud to Mildura. After that, we had one week rambling around outback NSW. We took in Broken Hill, Silverton and Lake Mungo, and all the little towns between.
Our motley crew
My travelling companions were fellow photographers from the Victorian Photographers Collective plus their spouses. Thirteen of us left Melbourne on Sunday and met up with two more in Broken Hill and Mungo. Sixteen photographers in total, everyone got on great and looked out for each other. We laughed, groaned at the walking and had a ball. We covered around 2000 km, and a fair amount of that was dirt roads. However, I think I am cured of dirt roads for the next year!

St Arnaud
Our first overnight stop was at St Arnaud. Solely based on it was the closest proximity to Rapunyup that had reasonable accommodation. It’s also where another silo was in the progress of being painted. So we stayed in a very nice budget motel in St Arnaud and headed off on the 40 min journey to Rapanyup next morning. The organisers of the silo art trail boast about the extra tourists the silos are bringing to the region, but accommodation and cafes are thin on the ground (if not invisible), and everyone just stops, shoots off a few pics and travels on. So the towns still have a ‘lost and neglected’ feel to them. Shops are boarded up and empty. No one was on the street.
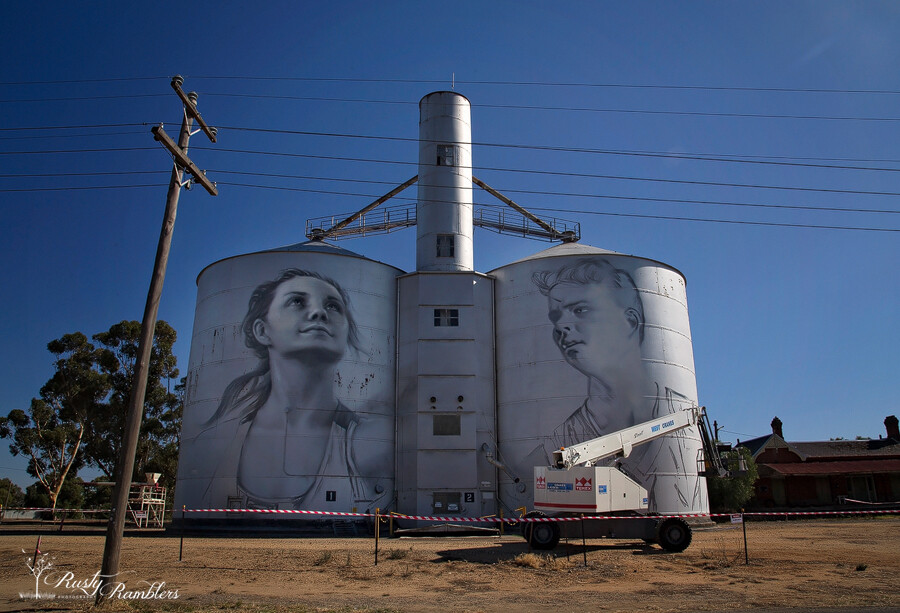
Rupanyup
Monday morning, we woke to glorious sunny blue skies… warm enough for t-shirts too!. We left St Arnaud after breakfast and headed to Rapanyup. The silos are smaller than the huge concrete ones painted already—the artist Julia Kolchkova from Russia. Julia started about a week ago. At the rate, she is going; they will be finished in the next week or so. Behind the silo’s is a disused Railway Station – apparently, it has been sold, but I don’t its purpose be. It’s probably too much to hope that it will be a cafe and gift shop or B & B.


Sheep Hills
The next stop on our trip heading North West was Sheep Hills, just 42kms down the road. These were much taller than the Rupanyup Silo’s and were painted by Matt Adnate. Again, an incredibly realistic Aboriginal face gazed down on us, the detail on them is amazing. The chap in the red shirt saw us all pull in and checked it out too. He hadn’t heard of them. But he gives you an idea of the size of the silos.


Brim
After stopping off in Warrackanabeal for lunch and a wander around, we headed towards Brim. The Brim silos were the first to be painted, and their popularity led to the others. The Brim Silos stand beside the Henty Hwy and are the work of Guido Van Helton. They feature four locals from the area. Driving into town, you can see them from miles out. They dominate the skyline as you drive in.


Patchewollock
The next stop was Patchewollock, 87kms up the road. It was the longest gap between painted silo’s, as the two more scheduled to be added by the end of the year, are in Rosebery and Lascelles. They will be between Brim and Patchewollock. There is no cellular reception in town, or the surrounding area so don’t rely on your phone as a GPS. You’re going to need paper maps to direct you to the next town. There was also no petrol or food that we saw in Patchewollock. So fill up both the car and yourself in Warracknabeal. Alongside the silo look for the old Patchewollock Station. Old machinery and carts gracefully rusting into the red Mallee earth are dotted around the station.


Red Cliffs, Mildura
From Patchewollock, relying on paper maps we headed first to Walepeup, then Ouyen and finally Mildura. Our overnight destination for the day. Just before Mildura, we stopped off at Red Cliff’s lookout. And drove around in circles for a while with everyone’s GPS telling them different things. We eventually found the lookout. damaged and fenced off, but with a fence low enough to be overcome 😉


Unfortunately, there was a glitch with our booking for the night, and there was no room at the inn. The motel owner found us alternate accom quickly, and we settled in down the road at Cottonmouth Motel. Lovely hosts, eager to help us and settle us in after the mix-up. The changing of motels and getting organised blew our plans for sunset out of the water, though. so we settled on a nice dinner at the local RSL

Princes Pier in Port Melbourne is a heritage-listed structure adjacent to Station Pier. The railway lines used to down the centre connecting it to the Port Melbourne Rail line. For this reason, it was initially named New Railway Pier.
Wartime Use
The pier opened on 29 September 1914. Significantly, the first Australian convoy carried troops to fight in WW1 left from its newly completed first section. Many of the soldiers who returned to Melbourne at the end of the war also disembarked at Princes Pier.

In honour of the royal visit by the Prince of Wales, it was renamed Princes Pier in 1921. The pier’s iconic two-level timber Gatehouse was added in 1935. This enabled better monitoring of cargo and traffic on and off of the dock.
The pier was also the departure point for Australian troops and the arrival point for the American forces during the Second World War. In the years following the end of WW2, it became the first landing point in Australia for post-war migrants along with Station Pier. Subsequently, over one million migrants landed there between 1947 and 1969.
Declining Years
The last migrant ships arrived in 1969. Additionally, with the shift to containers and the massive containerships being too big to berth at the pier, the dock was used less and less. Eventually, this led to Princes Pier being decommissioned in 1985. Over the next two decades, it deteriorated severely. In 2006 the Victorian Government committed $34 million to its restoration. The existing deck structure was removed. One hundred ninety-six metres of the pier were reconstructed, incuding repairing defective timber piles to support a new concrete deck. The gatehouse was refurbished, and a forest of piles was created at the seaward end of the pier in order to create a heritage and sculptural centrepiece. Today it’s a favourite spot for fishermen and photographers alike.


Crystal Ball photography has become extremely popular, but how do you do it, or where to start? Due to the shape of the ball, it’s refractive—meaning anything viewed through it is reversed—and it gives you a fish-eye effect without a fish-eye lens.
Crystal balls come in several sizes from 40mm to 110mm and are readily and cheaply available on eBay (though I have seen a 200mm!) While they are referred to as crystal balls, most are glass. The ball in these images is a glass 80mm. While the bigger sizes are more straightforward to photograph and fill more of the scene, their weight is considerable. I have a 40mm on the way… it will be much lighter, but the trade-off is what I can shoot. I’ve also dropped my 100mm or had it roll off a surface a couple of times, so it now has a couple of tiny dings in it, so I also have a 110mm on the way.

Photographing the Ball
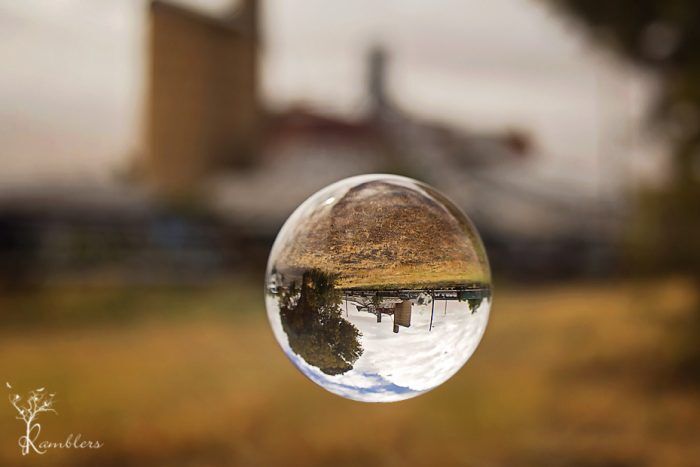
To have your crystal ball stand out from the background, you need a wide aperture – F4 or lower. Stand back from it and zoom in to get the soft, blurred-out background. The image above was shot at F4, 105mm, and about 4 feet away. Duck down so you are looking straight onto it or lower. Don’t shoot from above, as you will only get what it’s sitting on. Instead, focus on the main point of interest in the ball and shoot your image. Out of direct sunlight is best to avoid reflection (see the top right where the sun hit it on the ball above).
Positioning the Ball
To place the ball, you can either put it on a pole, a flat surface, in a shot glass, or water. (I’m going to try a golf tee next!). Location-wise, you need something interesting behind it. Place the ball and move your feet until you have a pleasing composition. It all depends on the angle. Keep a lint-free cloth handy to clean it between shots, or wear cotton gloves to keep the fingerprints off. Then shoot and have fun.
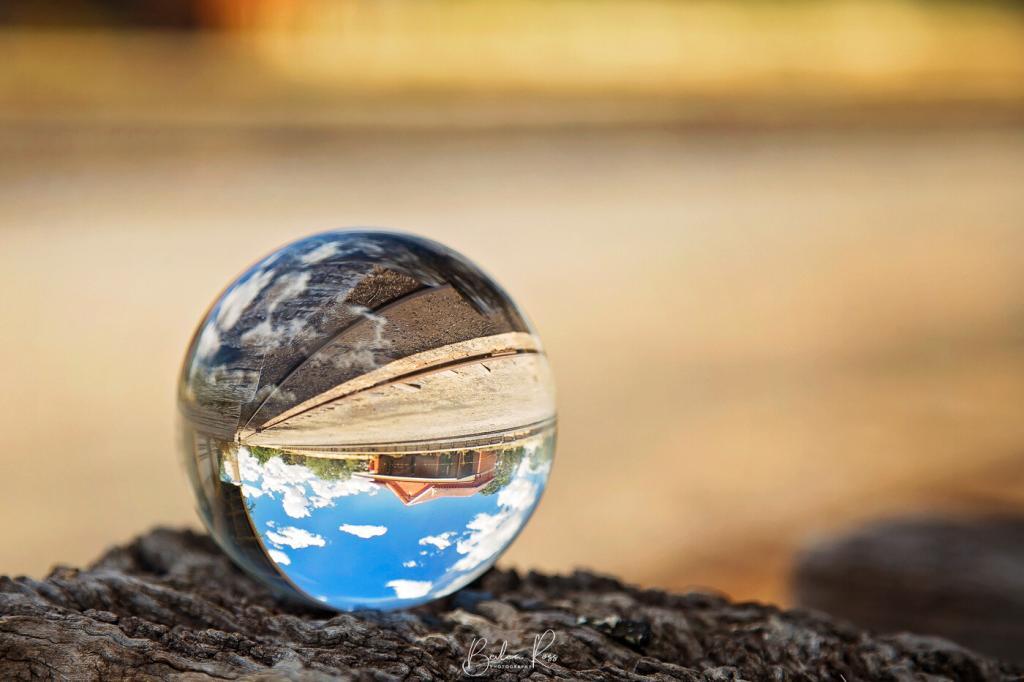
Rightside Up or Upside Down?
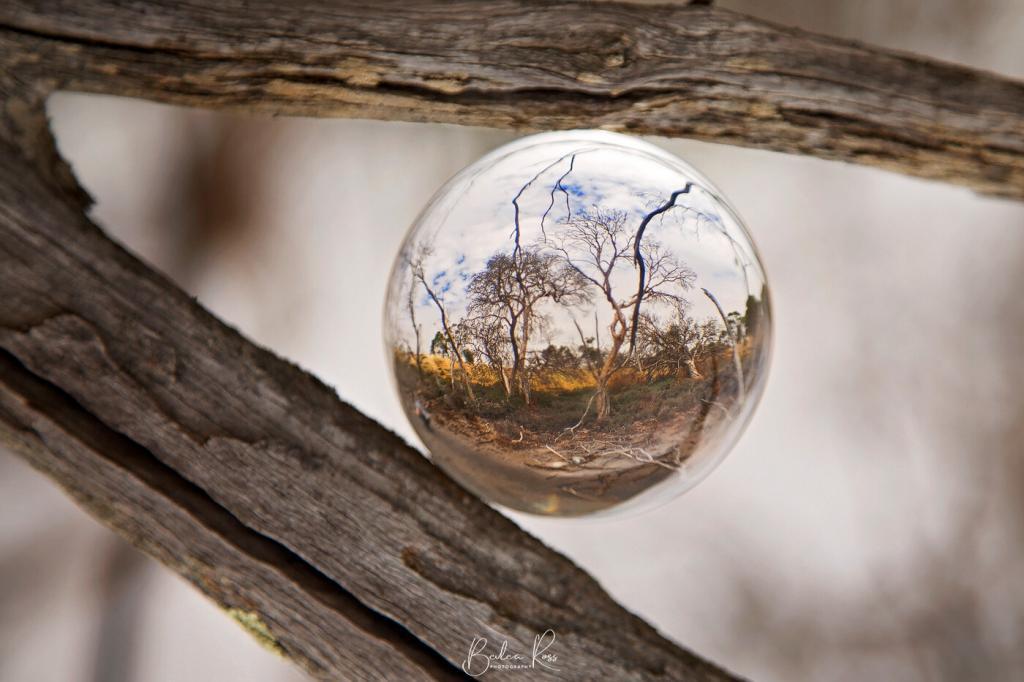
Because of the refractive aspect, your images are always upside down when shot… but you can flip them right side up using your editing program. For example, to get the shot of the wetlands below, we wedged the ball into the fork of a tree. Then, I flipped the image in Photoshop so it was right side up.
Floating?
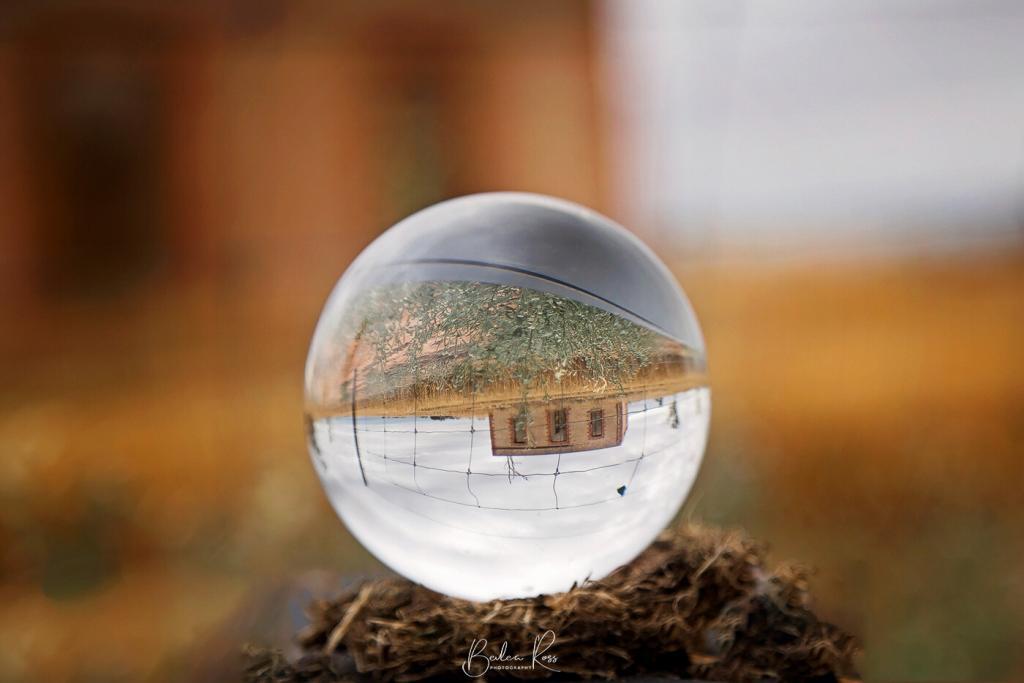
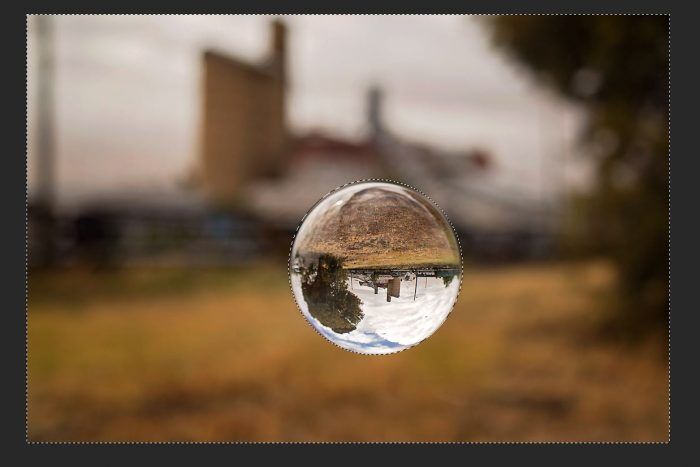
I wanted to get a shot that looked like the ball was floating/hovering in the air, so I placed it on a post and then removed the post in Photoshop. To do this, you can either go around the pole with the polygon lasso or use the elliptical marquee tool. It’s a bit fiddly using the elliptical tool, but I found it worked better as it was round like the ball. The polygon tool, however, is great for objects with irregular edges.

The first step is to drag the elliptical tool over your ball to fit. This may take a couple of goes till you get the size right. The marching ants around the ball mean that it only affects the ball, whatever you do.

However, we need to invert the selection so the area outside the ball is selected and the ball is protected. The keyboard shortcut on a PC is ‘Ctrl + Shift + I’ or on a Mac, it’s Cmd + Shift + I

Now, the marching ants are around the edge of the image and the ball. The ‘active’ area now includes everything except the ball, so you can safely clone out the post using your clone tool.
Now, all you need to do is ‘Ctrl + D’ on a PC or Cmd + D on a Mac to deselect the selection, close the marching ants, and make final adjustments or crop to your liking.
A word of warning
These balls can be dangerous in the sun! They concentrate the sun’s rays into an intense, direct beam of heat and light… I had seen a tripod begin smoking after just a few minutes when a ball was placed on one… and when I drove around all day with my 80mm crystal ball sitting in the console between the front seats, it melted the plastic underneath! So always keep your ball in a cloth bag when not in use, never leave it in the sun unattended, and if you are shooting it in dry grass… work quickly!

One of my favourite places on earth is Tropical North Qld.

Correction, it’s my most favourite place. It’s warm, usually sunny, the people are beyond anyone’s yardstick for friendly, and the lifestyle is so laid back you don’t need yoga or massages. I visited here in 2012, came back in 2014 and returned in 2016. This trip was impromptu – I usually don’t travel in the high season, but I wasn’t turning up the chance to go again.

Flights
We flew Jetstar, and apart from the struggle with cabin baggage restrictions, it was problem-free. I would guess 7kg as carry-on is acceptable for the regular holiday traveller. However, it is a challenge for someone who travels with a DSLR and several lenses. Fortunately, hubby was travelling with me this time, so I could span my gear across our cabin bags and the clothing was checked in.
A Pillow To Lie My Head On
We stayed in Trinity Beach this time rather than Cairns central, which turned out to be the best decision we could have made. Unlike Cairns, there were no parking problems or wall-to-wall people. Cairns is fabulous. But parking is problematic, and it’s becoming crowded.

Hopefully, it takes a while for people to catch on that Trinity Beach is only 25 mins from Cairns and awesome 🙂 (shhh, you didn’t hear it from me ). Our rooms at the Trinity Beach Club Apartments were fabulous. Comfy, well-appointed, reasonably priced, and only 5 mins walk from the beach. We made good use of the saltwater pool and spa too 🙂
Getting Around
You can use the ‘Sunbus’. I saw many of them around, and it seems an easy way of getting around. Each time I have been to Cairns, we have hired a car. Mainly because of the gear I lug around. And I hate waiting for public transport. As usual, we opted for an economy class car which before has served well. However, there was no cruise control, and the vehicle, a Hyundai Accent, struggled on hills with inferior pickup, Something I will be aware of next time when I book.
What To Do
Hubby is happy to just veg on holiday while I look for photographic locations when we are away. One given, when in Cairns, is we have to go to Hartley’s.
Hartleys Crocodile Adventures
I have been there every trip up North and never tire of it. It’s the best place to get croc pics and see them up close They also have excellent wildlife areas that cover lots of other Australian animals and reptiles Last time, I sat in on the Croc attack show. This time we were there in the morning, so we took in the Croc Feeding OMG, awesome, doesn’t cover it, And Ryan really needs a pay rise No way would I hand feed the beasts!


Cape Tribulation
Apart from Hartley’s, we finally drove to Cape Tribulation. I had wanted to go here for ages but never got there till this visit. The drive up from Cairns is about 2.5 hours, including crossing the Daintree on the car ferry. There is no bridge, so it’s the ferry or swim. And with about 60 crocs in the river, that’s not advisable. The ferry is a reasonable $26 return. It takes about 10 min Peak hour can see quite a lot of cars queued up, but if you avoid 10 am-12 pm or 3 pm-6 pm, it’s good. Once off the ferry, we drove to Cape Tribulation beach. It’s pristine, clean and quiet. Even though there were about ten other people there, it felt like you were the only ones on earth. The rainforest reaches right down to the sand. Idyllic doesn’t begin to cover it.


Kuranda
We took the Skyrail up and back to Kuranda to visit the market on Saturday. Another of my favourite things to do is the Kuranda Market. The heritage markets aren’t large but worth the visit. Loads of other shops, the traditional markets, cafe’s, Birdworld, Butterfly World, and Venom World are all within an easy walk. Being smart and too lazy to walk uphill, we took the courtesy bus up to the markets and then strolled back downhill when we were ready to return to the Skyrail.


Hubby also went out on a morning fishing charter with Paradise Sports Fishing and had a ball. While he was doing that, I chilled at the Esplanade Lagoon with my book.
Eating…..
We just about camped at the Trinity Beach Bar and Grill. Sprawling across the corner opposite the beach, it seemed a favourite of both locals and tourists. The food was great, portions large and reasonably priced. We tried the Trinity Beach Tavern one night, and the seafood was superb. Likewise, for the Blue Moon Bar and Grill. Both provided excellent food and good service. Our biggest disappointment was Chiantti’s Pizzeria. The pizza was ok, pasta less so.
Sunrises
One of the things I always try for and rarely get while on holiday is a decent sunrise. Out of the five days we were there, we went out twice. The best one of the lot was in the middle of our stay. With a huge rising red sun and a deep red, Of course, that day, I was driving into Cairns to take the man to his fishing charter and missed it 😐 On the days I did go out, I shot bracketed shots, combined them into HDR, and came home happy with the two I managed to get.


We have already promised a return in 2018. So if you are looking for heaven on a stick, Tropical North Queensland is the only contender in my book.

It was reptiles shootshoot day!
One of the benefits of being in a camera or photography group is the strength of numbers. Numbers that allow us to book or attend events, not normally open to the public. Hence our reptiles day.


Reptile Photoshoot
After hearing about a reptile photoshoot, we decided to investigate it as an event for our group (Victorian Photographers Collective). A few weeks later, a group of us met at the premises of the reptile handler. We tested it out as a group event before opening it up to the members. We photographed the slow and sometimes fast-moving reptiles and amphibians for ninety minutes, complete with a quick “hold this” (a green tree frog) while a recalcitrant snake was gathered up.


Apart from the said snake and a massive python named Darth Vader, they were all reasonably slow and happy to sit and pose for us. And surprisingly soft. I expected them to be rough-skinned, but they were like fine handbags (maybe not the most politically correct analogy LOL). I was also giving the new macro lens its second outing. It had been used on mushrooms the month before, but I was still unsure of its merits. But after Reptiles, I love it!
The Fine Details
All images taken under continuous soft boxes, on Canon 6D, AV Mode, F4, Auto ISO (averaged between 4000 to 6400) using Canon EF 100mm f/2.8L Macro IS USM

It was late May, and the photography tour to the South Island, New Zealand, that I had been waiting almost a year for finally rolled around. We flew out of Melbourne via Jetstar to Queenstown, NZ.
The flight
The flight was only around half full, so we had room to spread out. We approached Queenstown in a blanket of low clouds and rain just over three hours later. The pilots must have done 100% of the approach on instruments because we didn’t see the ground until we were only about 100 feet above it. The landing was comfortable, though, and we were through customs and biosecurity and out the door within a short time. Into rain, snow-capped mountains, and cold. Very cold.

Queenstown
We quickly found a shuttle bus that drops you off at the hotels in Queenstown, and for the princely sum of $13NZ, we were shortly deposited at the door and to the warmth of our hotel for the night. Looking at the weather, we dined in the hotel restaurant that night while the rain came down outside. The following day we were up eager to be collected by our tour host Jarrod from Jarrod Castaing Photography; we flung back the curtains to greet the day.

Funny thing about rain. When you start heading up the mountain in zero degrees and get to 700-800 feet above sea level, the rain becomes snow.

Coronet Peak
After picking up everyone, we drove up to Coronet Peak. Roads were icy, the lookout under a heavy blanket of snow. We had prepared well with our thermals, windproof pants, and feather down coats, but I should have also packed a full face balaclava. The wind off the snow was icy, pretty, but icy. Driving from Coronet Peak to Lake Tekapo, we went through the usually brown plains of Lindis Pass. They also were blanketed in snow, and it was still coming down quite heavily as we drove through it.
Church Of The Good Shepherd
Arriving safely in Lake Tekapo, we drove straight to the Church Of The Good Shepherd, which was oddly deserted. -1° Celcius and heavy snow falling go figure 😉

The plan was to do a sunset shoot at the church, but as getting one looked as likely as a heatwave, we all decided to relax in our rooms until dinner time. Fast forward to the following day, and the snow had stopped overnight, and the sky was clear. So we headed back to the church around 6 am, in the pitch dark, and set up the tripods to wait for the sun.

After standing around in the cold and the dark, the image that ended up as my favourite was the one above. Taken about 5 mins before we left as the sun came up. Leaving the church, we drove to Lake Alexandrina. Gorgeous place. totally empty of tourists, shhhh, I don’t think they know about it yet 😉


Mount Cook
From Lake Alexandrina, we headed for breakfast and then off towards Mount Cook. Passing by Lake Pukaki, we stopped in for a quick shoot. Lake Pukaki is a sparkling blue lake fed by the alpine glacier lakes. Sir Peter Jackson chose this part of the Southern Alps – the main divide stretching north-south the length of New Zealand’s South Island – as the setting for ‘Lake-town’ in The Hobbit: The Desolation of Smaug.


Arriving at Mount Cook, we booked into the Hermitage and got ready for the planned afternoon shoot at the Hooker Valley. I had been looking forward to this part since I first signed on to the tour. But I had drastically overestimated my ability to walk 1.5hrs each way, uphill and down dale. And about 40 mins into the walk, we turned back and left the others to finish. It was mean (but rewarding) to hear later that the others also struggled with the walk, and the light was dreadful when they got there, and no one got their postcard shots.

Hooker Valley trail
The Hooker Valley trail leads to Hooker Lake. the valley is ruggedly beautiful, and I still haven’t seen the lake in real life, but I can live with that.


Wanaka Tree
The following day, the sun was out. As it rose and hit the snow-capped peaks, they turned a glorious golden yellow. Coming from a city that never sees snow, it was a sight to behold. After breakfast, we headed off again. Our destination was Lake Wanaka and that famous tree. We were scheduled to do a sunrise and sunset there. Sunset cooperated with us, but sunrise just didn’t happen. It was drizzling as we arrived for the sunrise, and heavily by the time we sought the refuge of the van.


Leaving the lake, we headed into town for breakfast and dried our coats, hats, gloves, etc., on the grate around the fire while we ate breakfast. Following breakfast, we headed towards Milford Sound, going over the Crown Range, which had been closed to traffic a few days before due to heavy snowfalls.

Milford Sound
We passed down the Crown Range road, through Queenstown and headed towards Te Anau for lunch. Then the last 2-hour leg to our final and last night destination Milford Sound. Once we left Te Anau and got closer to Milford Sound, we lost mobile reception. The last 21 kms before the tunnel is an avalanche zone, and no stopping is allowed. like so many bridges in NZ, the tunnel is single lane – one car at a time – so we stopped to shoot some pics while we waited for our turn to enter

Envisaged by early settler Henry Homer in 1890, the tunnel was eventually started during the Great Depression in 1929. Five men armed with picks and shovels hacked through to the solid bedrock of the Homer Saddle and brought in the heavy machinery to start drilling. Years later, the tunnel was complete when the workers finally emerged into the Cleddau Valley. Unfortunately, several men had died over the years from avalanches, including one avalanche proof hut in 1945.

Sunset at Milford was beautiful. and a very accommodating Egret decided to sit in the foreground for the tourists 🙂 We were staying at Milford overnight. They really have a seller’s market, being a long way from anywhere and with limited accommodation options. Our accommodation was backpacker style, at prices dearer than our plush hotel in Queenstown!
Sunrise
As the sun came up, it lit up the snow-capped mountains. Again we were there from 6 am – and sunrise was about 8 am. This shot was taken at about 8.20 am. I wasn’t moving until I got the alpine glow on the mountains!

Back To Queenstown
After breakfast, we piled our gear back into the van to head back to Queenstown, stopping along the way at Mirror Lakes and Cascade Forest.
We arrived back in Queenstown late afternoon, picked up our hire car and headed to our hotel. Had a fabulous time. I learned lots and finally have my head around histograms lol I was left wondering a few things though New Zealand is a funny country.
- why so many single-lane bridges? didn’t they think cars or horse and carts might like to pass each other? and if it dates to horse and cart…geez a couple of hundred years later and they haven’t widened them?
- Things that we buy over the counter here in Australia you need a script for in New Zealand
- For a country with more sheep than people, why are all the woolen products so expensive?
- And possums… supposedly they are vermin to be eradicated. Yet to buy anything made from possum fur – you could have bought a mink coat!
- Petrol….$2.05 a litre!!???
As an infamous redhead said, please explain, lol

Long Exposure Photography or slow shutter photography uses long shutter speeds to capture stationary, static objects while blurring out the moving elements.
What is Long Exposure Photography?
It is most commonly used for night photography, stars, and moving water. It is also used for fireworks and light painting. A bonus in high-traffic areas is if the exposure is long enough, pedestrians will completely disappear.
Long exposure photography is easiest in low light situations such as at night. But with ND filters, it can also be done successfully, even in bright sunshine. ND Filters (Neutral Density) are precisely that. They are neutral and should add no colour at all to your image. Instead, they reduce the light entering the lens. ND filters come in different strengths from .06ND and up, with the .06 giving you a two-stop reduction and the ND 3 (also referred to as an ND1000) a ten-stop reduction.
Essential
A tripod is essential for all long-exposure photography. This is because you are using speeds beyond what can be handheld with stability. Turn the image stabilisation off on the lens while it’s on a tripod and use either a remote switch to trigger the shutter or the timer function. It’s also a good idea to set a 2-second delay on the shutter. The slightest movement of depressing the shutter can blur the image. The same goes for bridges etc. Someone starts walking across if you are on a bridge trying to get a shot. Wait till they are gone.
Light Painting
Light painting is best accomplished in bulb mode. Set your ISO to 100 to limit the noise, and make sure noise reduction is turned off on the camera. If you are interested in Light Painting, I highly recommend the events run by Melbourne Light Painting.


Moving Water
One of my favourite long-exposure subjects is water. Waterfalls, streams, rivers, ocean tides, and waves are where the ND Filters come into their own to give you the milky fairy floss water or mist. For early mornings or late afternoons, an ND2 or ND4 is sufficient. However, for bright sunshine, you’ll need to get out of the ND3. You can also stack the filters, but be aware if your filter gives off a slight colour cast, stacking them will magnify the result. I started with the round screw-in filters. However, I moved to the square ones as I wanted to add graduated filters to my pack. Variable filters are something you want to avoid at all costs. They leak light and give you terrible results.

Settings
To do an extended water exposure, set your camera to Aperture Priority, ISO 100, and the F stop you prefer and take the shot. Note the shutter speed, and using an ND calculator app, calculate the shutter speed for the long exposure. Next, move to manual mode, and use the same F stop, Focal length, and ISO. For example, if using an ND ten stop, it will be so dark you need to focus on your subject before the filter is added. Once the filter is on, then switch the lens to MF. Once you have done your settings, add the filter and take the shot.
Note: if the water is moving fast, such as in the falls above, a shorter shutter will give you blurred water. If it’s slower-moving or just a trickle, a longer shutter is required, as the speed of the water affects the blur.

Night Lights


If you haven’t tried long exposure before, get out and give it a go… its a lot of fun!